
Introduction
In my day job, we recently started a project that we thought would be a good fit for a Windows Store app - especially with the upcoming Windows 10 which will allow Store Apps to run in a window and look more like traditional desktop apps.
This blog post is a diary of getting started with Window Store Apps from the perspective of a relatively seasoned WPF developer. Spoiler: It didn’t go well. However, I realise that with any framework there are roadbumps, so think of this this as a “new user experience evaluation”.
Background
We needed the application the be modular so I figured this would be the perfect excuse to try out Prism which has been updated to work with Windows Store apps. having watched a couple of videos and read a few articles I felt like I was ready to get started. I’m using Visual Studio 2013 - at the time of writing Visual Studio 2015 is still in CTP.
Getting Started
First thing to do was create a new project.
Now; Universal App vs Windows App? It’s unlikely that this app will ever be run on phones, but tablets? Maybe. Also people are saying Universal Apps are the future? Lets go with that. There’s not really any guidance I could find on whether or not Windows Apps should still be used.
So Blank App (Universal App) it is:
using System;
using System.Collections.Generic;
using System.IO;
using System.Linq;
using System.Runtime.InteropServices.WindowsRuntime;
using Windows.ApplicationModel;
using Windows.ApplicationModel.Activation;
using Windows.Foundation;
using Windows.Foundation.Collections;
using Windows.UI.Xaml;
using Windows.UI.Xaml.Controls;
using Windows.UI.Xaml.Controls.Primitives;
using Windows.UI.Xaml.Data;
using Windows.UI.Xaml.Input;
using Windows.UI.Xaml.Media;
using Windows.UI.Xaml.Media.Animation;
using Windows.UI.Xaml.Navigation;

// The Blank Application template is documented at http://go.microsoft.com/fwlink/?LinkId=234227

namespace Vera
{
	/// <summary>
	/// Provides application-specific behavior to supplement the default Application class.
	/// </summary>
	public sealed partial class App : Application
	{
#if WINDOWS_PHONE_APP
		private TransitionCollection transitions;
#endif

		/// <summary>
		/// Initializes the singleton application object.  This is the first line of authored code
		/// executed, and as such is the logical equivalent of main() or WinMain().
		/// </summary>
		public App()
		{
			this.InitializeComponent();
			this.Suspending += this.OnSuspending;
		}

		/// <summary>
		/// Invoked when the application is launched normally by the end user.  Other entry points
		/// will be used when the application is launched to open a specific file, to display
		/// search results, and so forth.
		/// </summary>
		/// <param name="e">Details about the launch request and process.</param>
		protected override void OnLaunched(LaunchActivatedEventArgs e)
		{
#if DEBUG
			if (System.Diagnostics.Debugger.IsAttached)
			{
				this.DebugSettings.EnableFrameRateCounter = true;
			}
#endif

			Frame rootFrame = Window.Current.Content as Frame;

			// Do not repeat app initialization when the Window already has content,
			// just ensure that the window is active
			if (rootFrame == null)
			{
				// Create a Frame to act as the navigation context and navigate to the first page
				rootFrame = new Frame();

				// TODO: change this value to a cache size that is appropriate for your application
				rootFrame.CacheSize = 1;

				if (e.PreviousExecutionState == ApplicationExecutionState.Terminated)
				{
					// TODO: Load state from previously suspended application
				}

				// Place the frame in the current Window
				Window.Current.Content = rootFrame;
			}

			if (rootFrame.Content == null)
			{
#if WINDOWS_PHONE_APP
				// Removes the turnstile navigation for startup.
				if (rootFrame.ContentTransitions != null)
				{
					this.transitions = new TransitionCollection();
					foreach (var c in rootFrame.ContentTransitions)
					{
						this.transitions.Add(c);
					}
				}

				rootFrame.ContentTransitions = null;
				rootFrame.Navigated += this.RootFrame_FirstNavigated;
#endif

				// When the navigation stack isn't restored navigate to the first page,
				// configuring the new page by passing required information as a navigation
				// parameter
				if (!rootFrame.Navigate(typeof(MainPage), e.Arguments))
				{
					throw new Exception("Failed to create initial page");
				}
			}

			// Ensure the current window is active
			Window.Current.Activate();
		}

#if WINDOWS_PHONE_APP
		/// <summary>
		/// Restores the content transitions after the app has launched.
		/// </summary>
		/// <param name="sender">The object where the handler is attached.</param>
		/// <param name="e">Details about the navigation event.</param>
		private void RootFrame_FirstNavigated(object sender, NavigationEventArgs e)
		{
			var rootFrame = sender as Frame;
			rootFrame.ContentTransitions = this.transitions ?? new TransitionCollection() { new NavigationThemeTransition() };
			rootFrame.Navigated -= this.RootFrame_FirstNavigated;
		}
#endif

		/// <summary>
		/// Invoked when application execution is being suspended.  Application state is saved
		/// without knowing whether the application will be terminated or resumed with the contents
		/// of memory still intact.
		/// </summary>
		/// <param name="sender">The source of the suspend request.</param>
		/// <param name="e">Details about the suspend request.</param>
		private void OnSuspending(object sender, SuspendingEventArgs e)
		{
			var deferral = e.SuspendingOperation.GetDeferral();

			// TODO: Save application state and stop any background activity
			deferral.Complete();
		}
	}
}
Holy shit!
That’s a lot of boilerplate! Takes me back to the MFC days (yes, I’m just about old enough). Luckily having watched the Channel 9 video Prism for Windows Store apps I know that it will all be deleted.
Aside: It appears from watching the above video that the default template is geared toward developers who prefer the code-behind approach to coding. Except: every developer I’ve ever heard of that uses the XAML stack uses MVVM. Why are MS still promoting code-behind to developers starting out? IMO it should be MVVM from the beginning. The only excuse is that code-behind development requires less code for a basic starting app. Except you can plainly see that that is not the case here.
Installing Prism
Right-click solution -> Manage NuGet Packages for Solution, search “prism”, “Prism.StoreApps”, install in both Windows and Windows Phone projects - easy.
Now we can delete all that nonsense in App.xaml.cs. Yay!
using Microsoft.Practices.Prism.Mvvm;

// The Blank Application template is documented at http://go.microsoft.com/fwlink/?LinkId=234227

namespace Vera
{
	/// <summary>
	/// Provides application-specific behavior to supplement the default Application class.
	/// </summary>
	public sealed partial class App : MvvmAppBase
	{
		/// <summary>
		/// Initializes the singleton application object.  This is the first line of authored code
		/// executed, and as such is the logical equivalent of main() or WinMain().
		/// </summary>
		public App()
		{
			this.InitializeComponent();
		}
	}
}
MUCH better! Now I have to go and do the same in the XAML designer (wouldn’t it be nice if it could do this automatically?).
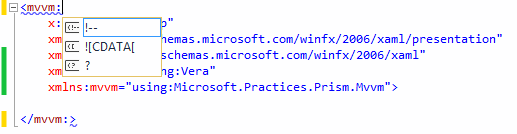
I see XAML intellisense is helpful as ever! I was wondering if the WPF experience was second rate compared to Windows Store but it looks like they both have the same problems. Never mind, I know what the class is called and after all, I understand: enumerating the content of a namespace is difficult.
Navigating to the Start page
Now we can add the OnLaunchApplicationAsync method override in to navigate to the start page which we’re just about to create:
protected override Task OnLaunchApplicationAsync(LaunchActivatedEventArgs args)
{
	NavigationService.Navigate("Start", null);
	return Task.FromResult<object>(null);
}
Ok, and now onto… hold on… Ummm… What? You can’t find InitializeComponent now?
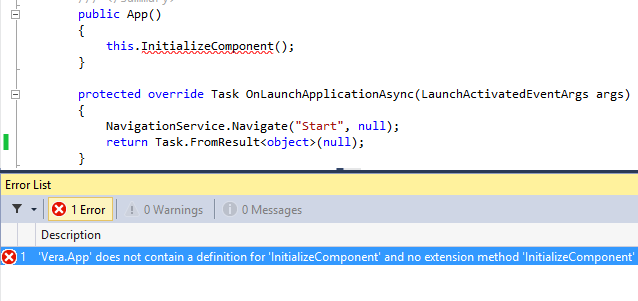
F6… Ok, you can find it now. It seems that whenever I make an edit in App.xaml.cs it confuses
intellisense and marks this.InitializeComponent(); as an error until I do a build. That’s
something I never saw in WPF. Starting to look like we didn’t have it so bad.
Adding the start page
I want a start page like in the Windows 8.1 Reader application that will allow the user to open a file:
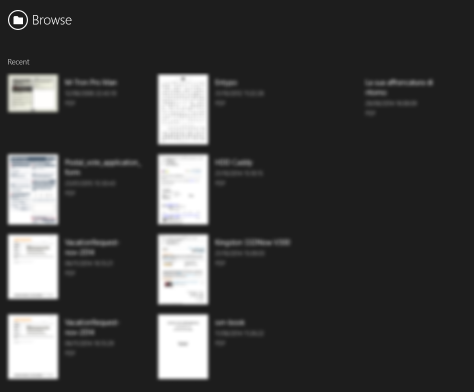
First step is to create a Views folder, and in there create a Blank Page called “StartPage”.
Creating a Circular Button… or not…
Ok, now to create the circular button. Man, am I looking forward to a better syntax than the MahApps.Metro syntax for creating circular buttons with icons in them.
So how do I create one then? It must be one of the first things that the tutorial apps teach you. Hmmm… It doesn’t seem to be. Ok, here’s the AppBar control which has circular buttons. I wonder if I can use an AppBarButton?
<StackPanel Orientation="Horizontal">
	<AppBarButton Icon="Folder"/>
	<TextBlock VerticalAlignment="Center" FontSize="21">Browse</TextBlock>
</StackPanel>
Ok, that’s not bad for a first attempt, but the alignment is all off: there’s too much margin around the button. Can I change that somehow? Lets look in the template.
<StackPanel Margin="0,14,0,13" VerticalAlignment="Top">
	<Grid HorizontalAlignment="Center" Height="40" Margin="0,0,0,5" Width="40">
		<Ellipse x:Name="BackgroundEllipse" Fill="{ThemeResource AppBarItemBackgroundThemeBrush}" Height="40" UseLayoutRounding="False" Width="40"/>
		<Ellipse x:Name="OutlineEllipse" Height="40" Stroke="{ThemeResource AppBarItemForegroundThemeBrush}" StrokeThickness="2" UseLayoutRounding="False" Width="40"/>
		<ContentPresenter x:Name="Content" AutomationProperties.AccessibilityView="Raw" Content="{TemplateBinding Icon}" Foreground="{TemplateBinding Foreground}" HorizontalAlignment="Stretch" VerticalAlignment="Stretch"/>
	</Grid>
	<TextBlock x:Name="TextLabel" Foreground="{ThemeResource AppBarItemForegroundThemeBrush}" FontSize="12" FontFamily="{TemplateBinding FontFamily}" TextAlignment="Center" TextWrapping="Wrap" Text="{TemplateBinding Label}" Width="88"/>
</StackPanel>
Oh, no. The margins and sizes are fixed and there’s a TextLabel TextBlock in there that is in the wrong place taking up space at the bottom. That’s obviously not the way forward then. Hold on, I saw in some of the “New Page” templates that they had a back button with a circle! Lets take a look at one of them. Ok, Add -> New Item -> Basic Page.
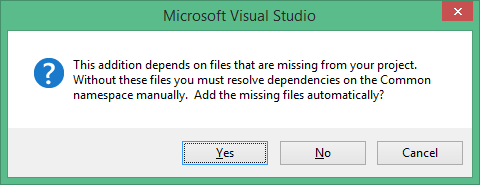
Uhhh… Not sure what this means, but as I just want to look at the XAML for the page I’ll click “No”.
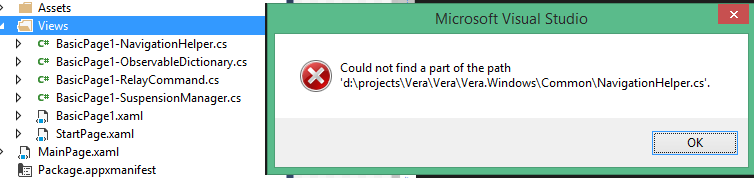
Okaaayyy… So I told you not to add missing files, but you seem to have gone ahead and added four extra files that do I don’t know what, and then told me that you can’t find a file, which appears to be because you’re looking in the wrong place… And then when I click on “OK” you bring up the “Add New Item” window again for… reason?
The good news is that WPF is starting to look really polished in comparison!
Anyway, lets delete those files and look at the XAML for that back button.
<Button x:Name="backButton" Margin="39,59,39,0" Command="{Binding NavigationHelper.GoBackCommand, ElementName=pageRoot}"
			Style="{StaticResource NavigationBackButtonNormalStyle}"
			VerticalAlignment="Top"
			AutomationProperties.Name="Back"
			AutomationProperties.AutomationId="BackButton"
			AutomationProperties.ItemType="Navigation Button"/>
Ok, so this isn’t how you do it either. There seem to be two styles defined for circular back
buttons: NavigationBackButtonNormalStyle and NavigationBackButtonSmallStyle but they aren’t
at all reusable for creating circular buttons with an arbitrary icon.
Shouldn’t this have been easy?
To StackOverflow it is. I guess I’ll continue this later.
Next Part: Getting started with Windows Store apps - Part 2